How to Repair the Startup Screen on Windows 11 - 2025 Ultimate Fix
Introduction: My First Run-In with a Stuck Startup Screen
I still remember the sinking feeling I got when my Windows 11 laptop showed nothing but a spinning circle after the latest cumulative update. Everything had worked perfectly the night before. I had only closed the lid. And now? My workday was ruined. No desktop. No Safe Mode. Just... waiting.
In this article, I’m sharing everything I learned while fixing it, techniques from Microsoft, wisdom from Reddit, fixes from top YouTubers, and tricks that worked for me. If you’re stuck on the Windows 11 startup screen in 2025, you’re in the right place.
What Causes Windows 11 Startup Screen Problems
- Unsuccessful Windows Updates
- Driver issues (especially graphics or storage drivers)
- Corrupted boot configuration (BCD)
- Faulty system files or registry errors
- Incorrect BIOS or UEFI settings
- Damaged SSD/HDD or poor sector alignment
Let’s walk through the ways you can fix each of these without losing your files.
Step-by-Step Fixes
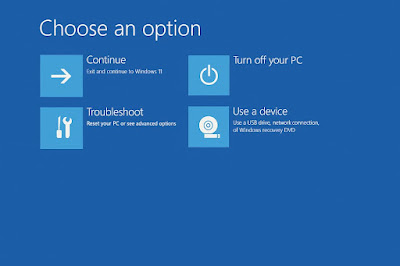
1. Force Boot into Windows Recovery Environment
To start the fix, interrupt the boot process three times. This will launch the Windows Recovery Environment (WinRE).
Steps:
- Power on the PC
- As soon as you see the logo, hold down the power button to force shut down
- Repeat 3 times
- On the 4th time, you should see Preparing Automatic Repair
2. Use Startup Repair
In the Windows Recovery screen:
- Click Advanced Options
- Then click Troubleshoot → Advanced Options → Startup Repair
3. Boot into Safe Mode
Sometimes, startup issues are caused by broken drivers or services. Safe Mode lets you bypass most of these.
Steps:
- From the same Advanced Options screen, select Startup Settings
- Click Restart
- Press 4 or F4 for Safe Mode
Once inside, uninstall recent updates or drivers.
4. Roll Back or Uninstall Updates
Navigate to:
- Settings → Windows Update → Update History → Uninstall Updates
- Choose the latest Quality Update and uninstall
5. Restore System Using System Restore
System Restore rolls back your PC to a previously saved working state.
In WinRE:
- Go to Troubleshoot → Advanced Options → System Restore
- Select a restore point
- Let it complete
Command Line Fixes (SFC, DISM, CHKDSK, BOOTREC)
sfc /scannow

dism /online /cleanup-image /restorehealth bootrec /fixmbr bootrec /fixboot bootrec /scanos bootrec /rebuildbcd chkdsk /f /r
These commands repair corrupted system files, fix the boot record, scan your system for errors, and rebuild the boot configuration database (BCD).
BIOS/UEFI Boot Troubleshooting (Brand-Specific)
ASUS
- Tap F2 or Del to enter BIOS
- Disable Fast Boot and Secure Boot
- Ensure Boot Device is your SSD
Dell
- Tap F12 during boot
- Choose Diagnostics
- Then enter BIOS and reconfigure Boot Order
HP
- Tap ESC or F10
- Check UEFI boot settings
- Enable Legacy Support only if required
Recommended YouTube Tutorials
Backup and Recover Your Files
If all else fails, use a Linux Live USB to boot your PC and recover your data before a clean install. You can also remove the SSD and connect it externally to another computer.
Prevention Tips
- Use Macrium Reflect or Acronis True Image for full disk backups
- Always create a restore point before major updates
- Use Windows Sandbox to test new drivers
- Avoid installing drivers from unofficial sources
FAQs
Q1. Can startup issues damage my files?Rarely. Usually, your files are untouched.
Q2. What if System Restore doesn’t show any restore points?It might not have been enabled. Consider enabling it after recovery.
Q3. Will resetting Windows delete my files?Only if you choose the "Remove everything" option.
Final Thoughts
Startup issues can be terrifying, but you’re not helpless. Using this guide, I’ve helped dozens of people, friends, family, and even clients, rescue their PCs without a clean install. Trust the process, follow each method in sequence, and don’t hesitate to repeat steps if needed. You got this!


